Breaking News
Loading...

Recent Post

Selasa, 06 Agustus 2013
Day 17 – OneNote: Put it on your To-Do List

Day 17 – OneNote: Put it on your To-Do List

30 Days with a Surface RT for Teachers 
Teaching and Learning with a Windows 8 Tablet

OneNote and the Surface RT are a great combination for teaching and learning. OneNote, as the name implies, is one place to keep all of your digital notes together in what are called Notebooks. Like the physical 3-Ring Binder you can organize digital Notebooks by topic. Within each digital Notebook you can make Sections, and within Sections you can add Pages, as many as you would like.


If you store your OneNote Notebooks on SkyDrive you can access them anywhere an Internet Connection is available using your Microsoft account.

You should give some thought to organizing your OneNote notebooks on the front-end as this will pay off big dividends later. Just like File Management having some structure to your notebooks will help you better organize, store, and retrieve your digital notes. OneNote has excellent searching capability but I have learned over the years that organizing things on the front-end saves much time in the long run.

Your first decision is whether you want to make your OneNote Notebook Public or Private. About 90 percent of my OneNote notebooks are private. You may want to make a Notebook public for an ePortfolio project or share with a few select students for a class notes notebook.

Organizing Notebooks, Sections, and Pages

I tend to organize things by academic year so here is an example OneNote notebook structure.

Notebook Name: EIU Grissom 2013  

Section Name:
EIU Tech Committee 13-14
                        Page Name:   June 2013 Meeting
          July 2013 Meeting
                                                August 2013 Meeting       


Section Name: Toms To-Do Lists 2013
                        Page Name:    June 2013
                                                July 2013
                                                August 2013


Here is another example that a teacher or student might use for a Biology Class

Notebook Name: Biology 101 (Fall 2013)
Section Name: Chapter 1
Page Name:         Day 1 - 07012013
                                                Day 2 - 07022013
                                                Day 3 - 07032013

This structure works very well for me and keeps my notebooks organized by academic year or by semester. Next year I can replicate the structure and start anew. I often like to put in a date code like 07012013 for July 1, 2013 as I can search by the code if I want to know what I did in last Tuesdays class. That is just me, you can develop your own system that makes sense to you.

The other big payoff with organizing your notebooks upfront is that this will greatly help you later when you start searching for information contained in your notes. You can filter searchers  by notebooks, sections, and pages. Once you start accumulating notes they quickly grow and narrowing your search criteria by notebook, section, or page is a good way to find things faster.

Let’s take a closer look at my To-Do List:

There are so many great things about OneNote for teachers and students that it is hard to know where to begin. Many teachers keep to-do lists and this is as good of place as any to start. To-Do Lists are immediately useful and will allow you to get a feel for how OneNote works.


I organize my To-Do Lists by month, but do whatever works for you. Maybe you have a project you are working on. You can make a section just for that project, for example – My Special Project 2013. You can then add Pages underneath the My Special Projects Section related to it. Often times I will only have one page under a section, especially for to-do lists as I do not want to scatter the information everywhere. 

If it is a really big special project you might want to consider making it its own Notebook.

If you are new to OneNote 2013 I highly recommend you go through this introductory tutorial by clicking on the following link:

Create your first OneNote 2013 notebook


This tutorial is a PowerPoint .pptx file that contains short videos about how to use OneNote.

The other tutorial I would suggest is “Make the switch to OneNote 2013”. Both tutorials are well done and each topic within the PowerPoint is only two to three minutes in length.

Make the switch to OneNote 2013


If you would like you can download the PowerPoint files locally to the Surface RT and watch the videos locally, even if you do not have an Internet connection.

Microsoft has developed additional training materials for other Office 2013 applications and I highly recommend you take a few minutes and go through the tutorials. If you are interested in learning more about using Word, Excel, PowerPoint, and OneNote on the Surface RT click on the link below for other tutorials.

Additional Office 2013 training


So, with that, you should be well on your way to discovering what OneNote 2013 and the other Office applications can do for you when using the Surface RT.

Until next time...
Keep on Learning,

Tom Grissom, PhD

Follow me on Twitter @tomgrissom

Interested in Teaching and Learning with Technology?
http://www.eiu.edu/itc/
Please subscribe and listen to the TechTalk4Teachers Podcast:
http://techtalk4teachers.blogspot.com/


Senin, 05 Agustus 2013
Day 16 – The Best Application You Probably Have Never Used for Teaching and Learning - OneNote

Day 16 – The Best Application You Probably Have Never Used for Teaching and Learning - OneNote

Teaching and Learning with a Windows 8 Tablet
30 Days with a Surface RT for Teachers 
 
Yesterday, I asked the question if the Surface RT was worth it? For me, the answer is definitely yes for a number of different reasons. The Surface RT makes a great companion device and is excellent for what it is designed to do. 

The other big plus for the RT is the current education price of $199 that makes this device appealing to those interested in learning more about what this new class of device offers schools. I think many will be surprised if they just give the Surface RT a chance to prove itself.

The biggest strike against it however, is the ARM processor that is at times a little under powered for certain tasks. The flipside to this lower power processor is that the battery-life is extended for all day use.

The Surface RT comes with the Office 2013 applications of Word, Excel, PowerPoint, and OneNote included. The free Office 2013 applications are a second reason the Surface RT is worth considering for schools. These are the “Big Four” applications that teachers and students routinely need to get work done.

Wait, what was that last application you mentioned, OneNote? What is OneNote?


For teachers and students OneNote is one of the best kept secrets of the entire Microsoft Office 2013 Suite. OneNote is an absolutely fantastic program for keeping notes (something that teachers and students do often) but it can be so much more. OneNote is a natural fit for keeping ePortfolios that can be shared with others easily using SkyDrive.


The premise of OneNote is a digital 3-Ring Binder that you store and access information from any device that has the OneNote app installed. If you have an Internet connection you do not even need the installed app, just use the free Office Web App version using only a browser to access notes stored to your SkyDrive using your Microsoft account.


OneNote is organized into Notebooks that have Sections, and within Sections you can have Pages, just like the analog equivalent. The power of OneNote comes with its Search capability including the ability to search handwritten notes. It even has Optical Character Recognition (OCR) built-in that will search text within images. You can store your Notebooks locally or to the cloud using SkyDrive so your Notebooks can be available to you on any device with Internet access, including your mobile phone!


You may think this all seems a little familiar and you would be right if you have ever used Evernote. The Evernote app offers similar functionality and shares some of the same features available in OneNote. The main difference between the two is that OneNote is a little more structured than Evernote using the digital 3-Ring Binder concept. OneNote also pre-dates Evernote by five years as OneNote was introduced with Microsoft Office back in 2003, Evernote did not exist until 2008.

I have used both Evernote and OneNote in the past so I am familiar with both. Since I moved to using Windows 8 with the Surface Pro and the Surface RT tablets I have switched exclusively to using OneNote for all my digital note-taking needs. I am finding advantages to staying within the Microsoft ecosystem as it simplifies account access and offers me easy access to my data across multiple devices.

Why OneNote?

First, the digital Pen input on the Surface Pro is the best inking experience I have ever used on any device, bar none, it really is like writing on paper. The Surface RT also supports inking but the capacitive touchscreen is not nearly as good as the active digitizer on the Pro model. You can ink with the Surface RT it is just not as pleasant of a writing experience for me after being spoiled by the Surface Pro’s digital Pen. The other great feature on the Surface Pro is Palm-blocking technology that allows me to rest my palm on the Surface Pro’s glass and write in a more natural way, just like using paper.

Second, SkyDrive. I store some of my Notebooks to SkyDrive so I can access them anytime when an Internet connection is available. If I so choose I can also save my Notebooks locally or on a company networked shared drive. SkyDrive has the added benefit that my notes are available to me immediately when I sign into the Surface Pro, Surface RT, or other Windows 8 device using my Microsoft account.

If you use an iPad you first sign-in with your AppleID, then into your Google account if you are using Google Drive, then finally into Evernote if you are using Evernote for your note-taking. Three different accounts just to begin your workday, this all gets a bit messy quickly. The Surface RT together with Office 2013 applications and SkyDrive streamline this workflow all under one Microsoft account.

Third, OneNote is now available as an app for Android, iOS, and other Windows 8 devices. The OneNote app, called OneNote MX, is a bit watered-down (like most apps) and the features vary from operation system to operating system but the different apps do allow you to access your OneNote Notebooks on different types of devices. This is a big plus for me as I like having a choice of devices as I may change my mind in the future. For me, I have currently switched to primarily using Windows 8 devices as I can access the full-features of the OneNote application on both the Surface RT and Surface Pro tablets.

Fourth, you can share your Notebooks with students. This one takes a little bit of planning on your part but I know teachers that share their daily class notes with their students by giving them read-only access to their Lesson Notebooks.

Below is a video (this is from 2011 but well worth watching) of a Physics Teacher that uses OneNote to share class notes and homework problems with his students. He uses the digital Pen to solve problems in class and makes them available to his students by sharing his class notebook to SkyDrive and making it available to his students. Back then he was using a Gateway Tablet PC but just imagine what you can do now with the Surface RT. Using OneNote in this way essentially becomes a photographic memory to access everything the teacher does on the Whiteboard. All of this can be immediately available to all students as soon as the lesson is over, pretty cool!


There are many other features to tell you about OneNote and it will take a couple of additional blog posts to do so, but if you are a teacher or student you owe it to yourself to learn more about this amazing program.

OneNote Rocks!


Until next time...
Keep on Learning,

Tom Grissom, PhD

Follow me on Twitter @tomgrissom

Interested in Teaching and Learning with Technology?
http://www.eiu.edu/itc/
Please subscribe and listen to the TechTalk4Teachers Podcast:
http://techtalk4teachers.blogspot.com/


Setup and Start the SharePoint 2013 User Profile Service (UPS)

Setup and Start the SharePoint 2013 User Profile Service (UPS)

Start the User Profile Service:

  1. Open "Central Administration"
  2. Login as the SharePoint Install account
    This account must have dbcreate and securityadmin server roles on the SQL Server  {SQL Server 2012 Name}
  3. Click “Manage services on server”, under “System Settings”
     photo UPS9.jpg
  4. Find "User Profile Service" 
  5. Click "Start", on the right 
     photo UPS17.jpg

Create the User Profile Service (UPS) Application:

  1. Open "Central Administration"
  2. Click “Manage service applications”, under “Application Management”
     photo Picture1-2.jpg
  3. Click "New"
     photo UPS2.jpg
  4. Select "User Profile Service Application"
     photo UPS3.jpg
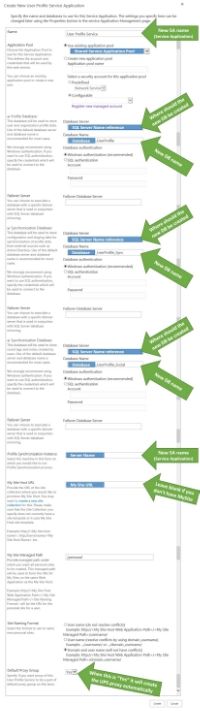
  5. Fill in the related fields
    (If I haven't mentioned the field, it has the default settings)

    a.  Name:  User Profile Service
    b.  Application Pool:  Use existing application pool:  Shared Services
     photo UPS51.jpg

    c.  Profile Database:
         i.  Database Server:  {SQL Server 2012 Name}
         ii. Database Name:  {Database}_UserProfile
     photo UPS52.jpg

    d.  Synchronization Database:
         i.  Database Server:  {SQL Server 2012 Name}
         ii. Database Name:  {Database}_UserProfile_Sync
     photo UPS53.jpg

    e.  Social Tagging Database:
         i.  Database Server:  {SQL Server 2012 Name}
         ii. Database Name:  {Database}_UserProfile_Social  
     photo UPS54.jpg

    f.  Profile Synchronization Instance: {SharePoint Server Name} (default - current server)
     photo UPS55.jpg
    f.  My Sites. If you don't have, in this example we done, you can leave it blank, as default.
     photo UPS56.jpg
  6. Click "Create"
     photo UPS6.jpg
  7. Click "OK"
  8. See full here: User Profile Service Application Settings

Start the User Profile Synchronization Service:

Make sure the SPFarm account has local admin access to the SharePoint Server the UPS synchronisation will be running on. This then needs to be removed once the synchronisation is complete.
  1. Open "Central Administration"
  2. Click “Manage services on server”, under “System Settings”
     photo UPS9.jpg
  3. Find "User Profile Synchronization Service"
  4. Click "Start", on the right
     photo UPS8.jpg
  5. Fill in the Share Point Farm account
     photo UPS10.jpg
  6. Click "OK"

Reset the IIS:

  1. Open "Command Prompt", as Administrator
  2. Type and enter:  iisreset
     photo UPS7.jpg
  3. Close "Command Prompt"

Create the Profile Synchronization Connection:

  1. Open "Central Administration"
  2. Click “Manage service applications”, under “Application Management”
     photo Picture1-2.jpg
  3. Find and Select "User Profile Service"
     photo UPS11.jpg
  4. Click "Configure Synchronization Connection", under Synchronization
     photo UPS12.jpg
  5. Click "Create New Connection"
     photo UPS14.jpg
  6. Fill in the related fields
    (If I haven't mentioned the field, i have left in the default settings.)

    a.  Connection Name:  User Profile Synchronisation
    b.  Forest name:  {DomainName.com} or {DomainName.local}
    c.  Account Name:  Share Point UPSync account
        This account must have "Directory replication rights" in AD (active directory)
    d.  Click "Populate Container"
     photo UPS15.jpg
    e.  Select the User Accounts you want to add
    f.  Click "OK"

Start the Profile Synchronization for the first time:

  1. Open "Central Administration"
  2. Click “Manage service applications”, under “Application Management”
     photo Picture1-2.jpg
  3. Find and Select "User Profile Service"
     photo UPS11.jpg
  4. Click "Start Profile Synchronization", under Synchronization
     photo UPS13.jpg
  5. Select "Start Full Synchronization"
     photo UPS16.jpg
  6. Click "OK"
    This will take a few minuets 
Minggu, 04 Agustus 2013
Day 15 – Thoughts Halfway through 30 Days with the Surface RT – Is it Worth It?

Day 15 – Thoughts Halfway through 30 Days with the Surface RT – Is it Worth It?

30 Days with a Surface RT for Teachers
Teaching and Learning with a Windows 8 Tablet


Well, I am halfway through this 30 Days with a Surface RT blog series and this is a good time to reflect on my experiences to date with the Surface RT. First of all, I went into this thinking I had a good handle on what the Surface RT could do. For the most part my expectations have been confirmed but there have been some surprises as well. I went into this with low expectations from press reports but have found my experience contrary to much of what I have previously read. With many 1:1 initiatives being considered across the nation more real-world information is needed about device capabilities before purchasing decisions are made.
Microsoft is currently offering the Surface RT at steep discounts for a limited time to schools and universities with an education price of $199 for the Surface RT alone, or $289 for the Surface RT and Type Cover Keyboard (I much prefer the type cover over the touch cover).

The Surface RT has taken a beating in the tech press and Microsoft has written-off $900 million dollars of Surface inventory due to over production. I have entered into this blog series at the low-point of Surface RT popularity.

One of the reasons I wanted to know for myself if the Surface RT is of any value for teaching and learning is due to the fact that Microsoft gave away 10,000 Surface RTs to teachers attending the International Society for Technology in Education (ISTE) Conference in San Antonio, Texas earlier this year. Imagine the possibilities these educators have to improve the classroom experience for their students.

Educators that received a Surface RT at #iste13 have a wonderful opportunity to experience for themselves how they can use the Surface RT in the classroom. Of course, some will say that the RT is a paperweight and will just collect dust in the corner. That would truly be a shame as I have experienced for myself these past two weeks a wonderful teaching and learning tool for teachers and students. My first post in this series was called  “Glass Half-empty or Half-full” at Day 15 it is definitely half-full for me however there are things that need improvement going forward. I also can say the same thing about the iPad as there is also room for improvement with it as well.

One thing that I am learning about the Surface RT is that it is not in the same category as the iPad and therefore should not be compared to it, but none the less most do. Since others are making this comparison I thought I would take a look at the current discounted pricing of the Surface RT compared to a discounted iPad and see what impact it might have on a purchasing decision given tight school or university budgets. Below is a graph of the total cost of purchasing between the iPad and Surface RT.

I used Microsoft Excel on the Surface RT to calculate the price difference between purchasing multiple Surface RTs and iPads in the quantities of 1, 10, 20, 30, 40, 50, 60, 70, 80, 90, 100, 150, 200, 250, 300, 350, 400, 450, 500, 550, 600, 650, 700, 750, 800, 850, 900, 950, and 1000. Below is a screenshot from the Surface with the numbers.


 I used a price of $289 for the 32GB Surface RT with Type Cover and $598 for the iPad with a cover and keyboard. The current price for a 32GB iPad is $599 without a cover or keyboard so I discounted it $100. This also does not include additional warranties or AppleCare. It also does not include wireless access costs or deployment servers that can easily double or triple the cost of the initial devices.

Many think that a few dollars difference in price per unit does not make that much of a difference in total costs but as you can see in the graph it makes a huge difference. Especially with larger quantities where the cost difference really begins to separate on the graph.
Depending upon your viewpoint this separation in price difference may be necessary to get the device for the job, or could be viewed as over-paying if the alternative meets or exceeds the requirements for the job.

So if you are buying 1000 devices for a 1:1 program the current price savings is $309,000 if you went the Surface RT vs. the iPad route. If you were a very large district and bought 10,000 devices that difference jumps to $3,090,000 – 3 Million dollars is a lot of money and a potential savings worthy of further investigation.

Looked at in a different way, you could buy devices for twice as many students for the same amount of money.

In these tight budget times there is enough of a cost difference to catch the attention of those who will be funding 1:1 initiatives, whether that be parents or taxpayers.

In the end the Surface RT should be judged on its capabilities and merits. Each institution will need to do their own homework and find the device that meets their needs based upon initial cost, functionality, deployment, and maintenance over a 3 or 4 year life-cycle. In year 4, most likely, you get to start the whole process over again, a lot can change in 4 years.

So, at the halfway point I have learned much but have much more to explore with the Surface RT. At this point I have more questions than answers, and that is a good thing.


Until next time...
Keep on Learning,

Tom Grissom, PhD

Follow me on Twitter @tomgrissom


Interested in Teaching and Learning with Technology?
http://www.eiu.edu/itc/

Please subscribe and listen to the TechTalk4Teachers Podcast:
http://techtalk4teachers.blogspot.com/

Sabtu, 03 Agustus 2013
Day 14 – PowerPoint 2013 on the Surface RT

Day 14 – PowerPoint 2013 on the Surface RT

30 Days with a Surface RT for Teachers
Teaching and Learning with a Windows 8 Tablet


Are you a fan of PowerPoint? Does the phrase “Death by PowerPoint” send a chill down your spine? Whether you are a fan of PowerPoint or not, I am sure we have all had less than stellar experiences sitting through a PowerPoint presentation, but it does not have to be this way.

For all the critics of PowerPoint out there I suggest we first take a look at the instructional approach taken when creating PowerPoints before passing judgment on the tool.  

Like a golfer that blames a club for a terrible tee shot, so it is with PowerPoint for some. Do you blame that boring PowerPoint for not getting students engaged in the lesson or could it be your instructional approach?


PowerPoint is just a tool and the presentation you produce will become what you make of it, for better or worse.

Students need to be able to organize and present content and PowerPoint is a great choice for presentations. Too often students focus on the animations and transitions available in the tool rather than the content that needs sorting through. Discovering what is needed and what can be left out is challenging for most students. I have seen many PowerPoint slide decks with 50 or more slides that need to be covered during a 20 minute presentation.

PowerPoint 2013 on the Surface RT has the familiar bullet point slide show templates that we have all become so accustomed to over the years. Some will still copy and paste large blocks of text into PowerPoint slides and read them word…. for…. word to an audience. Some will go overboard with the animations and transitions, others will go for artsy pictures and avoid text all together. There is no one best way to use PowerPoint and that is what makes it fun.

The trick of an effective PowerPoint presentation is to find a balance and like most things in life moderation is the key. You will need to use your judgment to find a balance with the content, presentation options, and instructional strategies you wish to be cover during the time allotted for a presentation.

PowerPoint has supported inking for years and being able to annotate over a slide while explaining things is very valuable for learning new things. I am guessing that 50% of teachers do not even know that there are inking capabilities already in PowerPoint and that you do NOT need a touchscreen to use them.

Since the PowerPoint 2003 version (maybe even longer) you have been able to hover your mouse in the lower left-hand corner of a PowerPoint slide (when in Slide Show view) and access the Pen tool for annotating over a slide. It’s always been there, the ghosted icons will appear in the lower left corner when you move the pointer over them.
 

What makes this annotation ability really great on the Surface RT is that the RT does have a touchscreen and you can use your finger to select the Pen tool or laser pointer to direct a students attention to a point you are teaching. I can draw better with my finger than with the mouse.

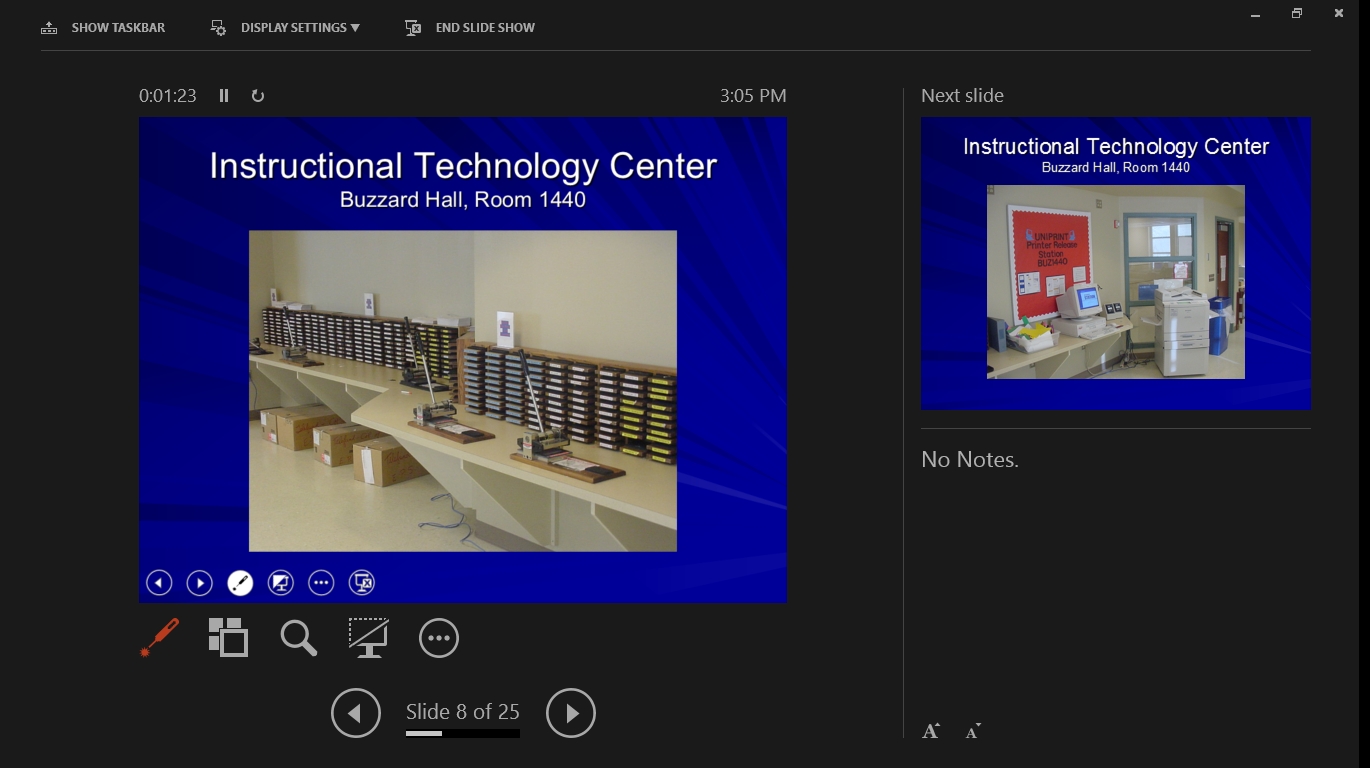
Another really cool feature of PowerPoint 2013 on the Surface RT is the absolutely fantastic “Presenter Mode” that allows the teacher to have their slides with notes and a preview of the upcoming slide on the RT screen but when the RT is connected to a projector or HDTV the students only see the current slide.


The Presenter View also gives easier access to the Pen Tool, Laser Pointer, and forward and back arrows to advance to the next or previous slide. It even has a timer to keep track where you are at in your presentation to compare to the available time you have left.


I have found a couple of missing features on the RT version of PowerPoint 2013, most notably is the lack of the ability to record your PowerPoint presentation on the Surface RT. If you want audio/video recording capability you will have to use a device with the x86 version of PowerPoint 2013 like the Surface Pro.

The last benefit of PowerPoint 2013 that I want to mention is that it is loaded locally on the Surface RT for free. What this means for teachers and students is that you can create presentations anywhere, anytime, even if no Internet connection is available.
 
Using cloud services is great when everything works but too often in a school setting there may be areas of the school where wireless is unavailable or unreliable. It is good to have the option to work locally on the Surface RT until you can get to an Internet connection.


Until next time...

Keep on Learning,

Tom Grissom, PhD

Follow me on Twitter @tomgrissom


Interested in Teaching and Learning with Technology?
http://www.eiu.edu/itc/

Please subscribe and listen to the TechTalk4Teachers Podcast:
http://techtalk4teachers.blogspot.com/

 
Jumat, 02 Agustus 2013
Day 13 - Microsoft Excel 2013 on the Surface RT for Teachers

Day 13 - Microsoft Excel 2013 on the Surface RT for Teachers

30 Days with a Surface RT for Teachers
Teaching and Learning with a Windows 8 Tablet

Microsoft Excel is a spreadsheet program that is a very valuable addition for teachers working with numbers in the classroom.  Whether you are just keeping track of student grades in a simple spreadsheet or collecting data for a Science experiment Excel is the best program for crunching numbers on the Surface RT.


I have taught Excel to teachers in the past and one of the nice features of using the Surface RT is the support of inking. Drawing the attention of the students eye to an area of the screen that you want the student to understand is very important when teaching someone something new. Yesterday, I shared that Word 2013 supports inking and how valuable it can be to annotate student work. The same is true for inking and Excel 2013. Being able to make handwritten notes next to formulas on an Excel spreadsheet makes the instruction much clearer than giving just oral instructions.

You get to inking in Excel 2013 similar to Word 2013. Go to the REVIEW Tab on the ribbon and select START INKING.


There are a couple of oddities that I have found in switching back and forth between inking and mouse mode when using Excel 2013. I sometimes have to double-click to select a specific cell when normally a single-click would do. I also have to sometimes press the ESC (Escape) Key to deselect something. It seems that Excel 2013 is not as fully baked as other programs so I expect Microsoft to continue to improve the ARM-based version to catch it up to the fully capable x86 version.

Unlike Word, Excel 2013 does not support pinch and zoom on the Surface RT. There is however a slider bar in the lower right-hand corner that allows you to slide for different zoom levels. Microsoft Word 2013 also has this zoom slider but I much prefer the pinch and zoom capability.

Of all the Office 2013 apps Excel seems to be the least touch friendly. I have had occasions where Excel will stutter and it sometimes does not seem to be as responsive to touch as the other Office 2013 applications. When using my fat fingers to move from cell to cell I really need to zoom in to get better accuracy.

Excel 2013 is the one app that causes me to reach for my Arc Mouse so I can use it as a traditional Desktop application. The Arc Mouse uses a wireless transceiver that I plug into the Surface RTs USB Port. The Arc Mouse gives me pinpoint accuracy when using Excel 2013 and makes for a much more pleasurable experience. I recommend finding a mouse if you will be using Excel very much on the Surface RT.

There are also a couple of other limitations with Excel 2013, most notably the lack of support for macros. The Surface RT version of Office 2013 is a port over to the ARM-based Surface RT system. This porting is not complete as some features like macros have not yet been enabled on the RT version. If you are only doing simple calculations this won’t be a big deal to you, but if you are an accountant you may find the RT version frustrating to use. If you do need the full power of the business class Excel 2013 program the Surface Pro would be a much better choice as it supports all of Excel’s functions including macro capability.

I have also ran into a few template issues that I tried to use with Excel 2013 on the Surface RT. Some templates I have used on the RT had problems with ActiveX components. Microsoft still has some work to do here to make Excel on ARM-based devices work as well as it does on x86 systems.

Overall the ability to run Excel 2013 on a tablet like the Surface RT is a positive. There are still some rough edges on the RT version but for basic spreadsheet work this capability is a great addition to the Surface RT.


 Until next time...

Keep on Learning,

Tom Grissom, PhD


Follow me on Twitter @tomgrissom

Interested in Teaching and Learning with Technology?
http://www.eiu.edu/itc/

Please subscribe and listen to the TechTalk4Teachers Podcast:
http://techtalk4teachers.blogspot.com/


Kamis, 01 Agustus 2013
Day 12 - Microsoft Word on the Surface RT for Teachers – This Changes Everything

Day 12 - Microsoft Word on the Surface RT for Teachers – This Changes Everything

Surface RT for Teachers -
Teaching and Learning with a Windows 8 Tablet


Yesterday I explained some of the features of the Surface RT that makes it different from every other tablet currently on the market. The Surface RT is a new and innovative hybrid product that the mass market has yet to fully understand. It has a mixture of PC features like a USB port, microHDMI, and SD Card reader that gives complete flexibility for moving and sharing content.

The Surface RT also offers inking capabilities that teachers will want to explore for annotating a students digital work and also offers the real possibility of going paperless in the classroom. You can easily annotate documents using the inking tools built into Word 2013. Below is a screenshot of a Word 2013 document that I marked up to demonstrate the capability of grading student papers using the inking capability within Word 2013 on the Surface RT.


As stated yesterday, the RT can run Microsoft Office 2013 but no other x86 programs. The ARM based processor gets all day battery life but is underpowered for some uses. It is literally a hybrid device trying to maintain the benefits of the PC but at the same time moving the ball forward toward a productivity tablet.

In my opinion, the Surface RT is more of a tablet with some laptop capabilities. The Surface Pro, the big brother to the Surface RT, is compatible with x86 programs and is more like a laptop with tablet capabilities. The two different types of Surface devices offer you a choice depending upon your usage needs. If you want to see my earlier review of the Surface Pro click here.

For teachers, Microsoft Word 2013 is a gem. Much of what teachers and students do is writing in some form or fashion and the new Word 2013 is the premiere word processor that is available for free with the Surface RT. One of the complaints from iPad users is that many wish the Microsoft Office Suite of programs were available on it. To date, this has not happened although there are occasional rumors that this might happen in the future. This currently gives the Surface RT the advantage over the iPad when it comes to getting productive work completed on a tablet using standard office applications.

The new Word 2013 features the familiar “Ribbon Interface” that first became available in 2007. Word 2013 is still a Desktop application on the RT but the icons on the ribbon have been spaced apart to make it a bit easier to use on a touchscreen.

I will spare you the details of all the capabilities of Word 2013 as it is a comprehensive list. Most users only touch the surface (pardon the pun) of Word’s capabilities. Since Office 2013 is a port over to the new ARM-based processor on the Surface RT there are a few capabilities that the ARM-based version of Office 2013 cannot do. This is more noticeable with Excel 2013, that does not support macros, and in OneNote 2013, that does not support audio and video recording on the Surface RT.


Worth the Price of Admission - Inking

One of the shining capabilities that Microsoft Word 2013 offers teachers is probably one of its least used. Word 2013 supports inking!!! Actually, all of the big four Office applications since 2003 support inking and this goes back to the Tablet PC days where Microsoft has been innovating for over a decade. This inking technology is a must know feature for teachers and students that use the Surface RT.

For teachers inking is a big deal on a touchscreen tablet like the Surface RT. For students, having the ability to take notes in a freehand format is also a great feature. To get to the inking capabilities in Word 2013 go to the REVIEW tab on the ribbon and select START INKING located in the upper right-hand area of the ribbon. Once you select START INKING you will see a new Tab on the ribbon called INK TOOLS –PEN. From here you can select the color of ink you want, select the highlighter tools, and other inking selections including Eraser and Select Objects.

You can use your finger to ink but I prefer the rubber tipped stylus that are made to use with capacitive touchscreens. You can essentially turn Microsoft Word 2013 (or OneNote 2013) into a Whiteboard.  If you connect the Surface RT to a projector or HDTV via its microHDMI port you have a touch-enabled display for your entire class to view.

The Surface RT uses a capacitive touch screen similar to the iPad and only supports finger input or a stylus with the little rubber tips. Your finger and the rubber tipped stylus do not allow for a great deal of accuracy when inking on the Surface RT but it is certainly doable. It is kind of like finger painting or writing with a stick in the mud, the inking experience on the RT does not support a lot of control for fine-motor work.

Keep in mind that I have become spoiled by the fantastic inking experience on the Surface Pro that utilizes an active digitizer screen with digital Pen input. This is a much more natural experience similar to a ball-point pen when writing on paper. It is also much more accurate as the Surface Pro supports “palm-blocking” technology that allows you to rest your palm on the touchscreen when writing with the digital Pen. If you do a lot of inking, the Surface Pro is well worth the extra money as it provides a faster, smoother, and more accurate inking experience that is a pleasure to use. It is so good that many artists are beginning to use the Surface Pro for their artwork.

Back to the Surface RT, given that qualification that the Surface Pro offers a superior inking experience, you can still do a lot with the Surface RT.

Grading papers is something that teachers routinely do and the Surface RT can be easily adapted into a paperless classroom environment. Using Word 2013 you can mark student papers with your natural handwriting annotations, save the document as a PDF file so the student cannot change the annotations, and email the Word document back to the student or save it to a network storage area that the student can access. You could also save it to SkyDrive if your organization allows its use in school and share it back with the student from there. This Surface RT offers many, many possibilities for a paperless workflow.

Two other features I want to mention about Word 2013 before I finish todays post are the pinch and zoom capability within Word and the ability to open PDF files and edit them with Word 2013.

Having the ability to open and edit a PDF file is something many teachers need to do from time-to-time and Word 2013 now has this built into the program. Once you have the document open and have enabled editing you can of course annotate it with the inking tools available in Word 2013.

I am really enjoying the inking capability of Word 2013. I even copy some of my Google Docs into Word so I can have easy access to the inking tools. This ability is very handy and practical for teachers!

Until next time...

Keep on Learning,


Tom Grissom, PhD


Follow me on Twitter @tomgrissom


Interested in Teaching and Learning with Technology?
http://www.eiu.edu/itc/

Please subscribe and listen to the TechTalk4Teachers Podcast:
http://techtalk4teachers.blogspot.com/


Quick Message
Press Esc to close
Copyright © 2013 Microsoft Office 365 All Right Reserved